Pages

Wednesday, June 6, 2012

New insert for Transformers lunchbag

The Transformers bag, complete with falling-apart lining.
Back in August 2011 I made my youngest daughter (then 13) a new lunchbag for school.  I found a great tutorial here, showed my daughter and she helped me design the bag the way she wanted it.  After all, if I made it and she hated it, well, that just wouldn't work at all!  My daughter loves Transformers.  Especially Bumblebee.  He is her absolute favourite.  So we decided on a black and yellow bag with a freezer-stenciled Transformers logo on it.  I made a few changes from the original tutorial.  I stenciled, rather than appliqued, I made a short handle on mine because that is what my daughter wanted, and I made sure that I made the stay-cold lining completely removable so that the bag could be laundered weekly.  This bag, by the way, has been washed almost every week since the beginning of September, that is why the logo is looking a little faded.  I haven't asked my daughter if she will want to carry a Transformers lunchbag around when she is in high school next year, my guess is 'yes', she's cool like that!  If she does want a new one, at least I know that I'll be able to just move the liner over!

The bag itself has been kind of holding the liner together for months.
Well, because the material I used originally for my lining doesn't sew well on the machine, I ended up just perforating it, not good at all! I tried to hand sew it together.  That lasted only a short while so I tried masking tape (you don't see the outside of the liner when it is in the bag).  Again, that only lasted a little while but this liner keeps her ice pack cold for so long that I didn't want to give it up so I bought some aluminium duct tape and used that.  At least that looked better when I removed the liner, but as you may have guessed, that didn't hold up either.  I decided that it was time to break down and make a new one.  I found this nifty vinyl type cloth-y stuff in the remnant bin of the fabric store.  Because it is a remnant, I have no idea what it actually is, but it sews up nicely and almost looks like canvas on the non-vinyl side.  I also had some heat resistant batting that my mother-in-law had given me ages ago to make potholders with.  I used what I had leftover after making the potholders.  I figured, if it is heat resistant, it will probably work for cold as well.
See!  I wasn't kidding about the horrible shape the liner was in!

So I did the best I could at measuring the old liner.  I didn't want to make it any worse than it already was just in case this new one didn't work.  I wanted to keep the old one to put back in the lunchbag, if needed.  After my (only slightly  inaccurate) measuring, I sewed it up.  I realized that I didn't have enough for the little cover flap, so I added that on after.
New lining, cut and ready to sew.


The 'before' and 'after' bag liners.


It isn't as stiff as the old liner so it looks odd, but believe me, it fits great.


With the little flap I had to add on.  I feel that the contents stay colder longer with this addition.


She has taken it to school twice so far and says it works great.  I threw the old liner out last night!


 I had a thought.  Since the vinyl-ish stuff looks like it has some type of fabric base, I wonder if this liner is machine washable.  I've washed my potholders many times, so I know that the other material is.  Using what little scraps I had left of the 'potholder' material (I have lots of the vinyl stuff left), I made a little test scrap to toss in the laundry.  We'll see how that testing goes,  laundry day isn't until Saturday.


The finished bag looks remarkably similar to the bag at the beginning of this post!
The new lining is in this, honest!  I am glad it looks the same from the outside.  There would probably be a problem somewhere if it didn't!

Thanks for reading! Pin It

Friday, June 1, 2012

Graduation accessories

Well, my youngest is going to be graduating from elementary school at the end of the month.  Grade eight graduation is a big deal.  Naturally she wants to look perfect.   She has had her dress for a while, and her shoes as well.  She dyes a streak of bluey-teal in her hair every few months and plans to have a bright, fresh one for the ceremony. 
She needed a necklace. 
I happen to know how to make necklaces!  She chose the design she wanted (which just happens to be my absolute favourite, I have made three for myself!) and her bead colours as well.  For the main accent bead, she chose a colour close to the colour of the streak in her hair.  If you want to make one for yourself, the free, downloadable PDF pattern can be found here.  I am so happy that the designer, Jann Christiansen, shared it and that I stumbled across this pattern years ago because I love it.
The beads have a blue or green hue depending on the light.  Awesome!


Against a white background.


Against a black background.

The original pattern calls for using a button for a closure.  I didn't like that so I covered a bead with more beads to make a ball instead.  I learned how to do that using these free instructions.


Apparently 14-year-old girls like clutches this year.  My daughter mentioned in passing that so-and-so was getting a clutch.  I asked if she required one.  Her answer was "no, but it would be nice to have somewhere to put my camera and phone".  I found a tutorial for a very cute one.  I felt that it had  to have a zipper closure.  We can't have a snap popping open while she is on the dance floor!  That really limited my options.  I used the tutorial found here if you want to make one yourself!
Her dress is black and I managed to find some pretty taffeta that is blue or green depending on how you look at it.  Perfect!


I was trying to show the different colours in the bow.  It looks way better in person.


I placed the necklace inside and presented it to my daughter when she got home from a school camping trip.  She knew I was making her a necklace (obviously, since she chose her colours), but the clutch was a surprise.

I love making things for my daughter.  She is always happy and appreciates everything.  This was no different.

Thanks for reading!  :)

Pin It

Wednesday, May 9, 2012

A Zergling? What is that? (part two)

I have finished the Zergling.  Hooray, hooray!  You can see part one of this post here.


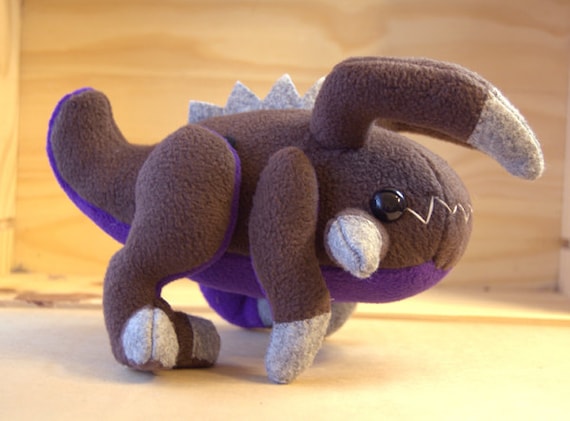
I put the spiky things on it's back, as you can see here.  It is really starting to look right.  At least, to me.

Then I added some plates to it's back.  I need to fix the legs a little here because they keep splaying out awkwardly.  Now all it needs are teeth, claws, tusks and eyes.  These could make or break it.


And here is the finished creature.  It turned out okay after all!  I sent my nephew a picture and was told that "it's really accurate, definitely impressive".
I am quite pleased with the way this turned out.  I hope this little guy is happy in it's new home.
:) Pin It

Monday, May 7, 2012

A Zergling? What is that? (part one)

My adult  nephew posted a plea on Facebook a while ago asking if someone could make him a model or a plush zergling.  After asking what on earth that was, I decided to make it a personal challenge.  I told him not to say 'no' to anyone who might actually know what they are doing, but I would give it a shot.

What have I gotten myself into?  This is the creature. It is from a game called Starcraft. That is all I know. 
Isn't he just stunning?

Picture from http://starcraft.wikia.com/wiki/Zergling

But he also sent me this picture of a stuffed one, so obvioulsy he is pretty flexible on just how accurate it looks.

Found here: http://img2.etsystatic.com/il_570xN.290660642.jpg
This one is a little too cutesy-poo for my liking.  Although I think I could have pulled it off.

I'm aiming for something in between.  Here is what I have so far.
My materials.  I'm not sure why I thought I needed green felt.....  Not shown are my first ever pair of glasses.  Apparently I'm getting older and I need them when doing things like sewing and beading.  Oddly enough, I don't require them for reading.

The paper is my attempt at sketching out my idea.  Did I mention that I have never made a stuffed animal without a pattern before?  I am totally flying by the seat of my pants here.

I sewed up the body and have to say that it is looking pretty goofy right about now.

It still looks pretty goofy, but I can see it starting to take shape.

This is as far as I have gotten.  My plan is to get those big spiky things on it's back today, then start embellishing it.  I'll keep posting progress even if this ends up being a failure.

Thanks for looking! Pin It

Friday, April 20, 2012

Dead sock-monkey and peeps

My eighteen year old graduated from high school almost a year ago but still goes back to see some of her friends and visit a few of her former teachers. One of those teachers is celebrating a birthday next week.  This teacher has a fondness for corny (read: bad) jokes. 
The favourite is :
Q.  Why did the monkey fall out of the tree? 
A.  Because it was dead!

I told you.  Bad.

Anyhow, my daughter asked if I could make a "dead" sock monkey for her to give this teacher.  How could I say no?  I showed my daughter the socks I already had that she could choose from and she chose a red monkey with cream details.


I think it's kinda cute.

Better than my Peeps.  I saw a tutorial for the cutest felt bunny peeps here and just had to make some.  The plan was to make them before Easter and give them to the girls.
Nope.
When I got Peep #1 done to the stage where you stuff it, I decided I didn't like it.  So I abandoned it and went on to Peep #2.  I decided to sew this one up differently.  Bad idea.  I like Peep #2 even less than I like Peep #1.  So I abandoned this too.  Easter came and went and the unstuffed, unloved felt Peeps just hung around.  Taunting me.  So I decided to at least finish them and see what they look like.
You know what?
Stuffed and sewn up, they are kinda cute.  I like Peep #1 better than Peep #2.  Go figure... 
Another part of the plan was to place them in these over sized plastic Easter eggs I picked up.  Guess what doesn't fit in the eggs.  Now I have absolutely no idea what I am going to do with them.  But I did learn to finish what I start because you never know just how it will turn out until it is done.


Pin It

Saturday, April 14, 2012

A Harry Potter Spell Book

Quite a while back, I saw a tutorial for this, complete with the spells already laid out in 4X6" format and set up as a free printable.  My thanks go out to Christie at A Lemon Squeezy Home for not just taking the time to create this fun printable, but for also sharing it for free!

I picked up a small, plain photo album at a dollar store.

See, non-descript, unsuspecting....  Nobody would ever guess the treasure inside!


Then I printed out Christie's spellbook, cut the pages and slipped them in the album.  Quick and easy!  My fourteen year old (yes, you read that right... fourteen year old) daughter thinks it is fantastic and has already requested that we make one for her Harry-Potter-loving-friend for her birthday (in five months!).

Inside we have a title page.


And the spells are laid out alphabetically.


We are already very familiar with nox...


Because it is on both girls' light switch plates!


Sorry, but I had to post the plates.  I made them ages ago and I am still quite proud of them.  :)

Now, if you have a Harry Potter fan in your life, pop over to A Lemon Squeezy Home using the link at the top.  It goes directly to the Spell Book project!
Have fun!


Pin It

Thursday, April 5, 2012

1-2-3 Cake!!!

What on earth is 1-2-3 Cake?  That is what I wondered too after a friend raved about it on Facebook.  So I looked into it. I'm sure that there are a gazillion posts about it already, but I found my directions here thanks to a different  friend pinning it.
Yummy treats don't get much easier than this!
I used cheap, No Name brand cake mixes.  I think I paid $3.50 for both mixes.  You must use an angel food cake mix, but the other mix can be any flavour you'd like.  For me it had to be chocolate.  All you do is mix your two cake mixes together.  I just dumped both into a Zip Loc bowl, put the lid on, held tight and shook it up.


There.  That is all the prep work done.


Now when you want a little treat, you just take a mug (we discovered that a smaller mug makes it look like a bigger treat!) and place 3 tablespoons of your mix in it. 


Add 2 tablespoons of water and mix it up.  (If the treat is for you, you can lick the spoon now and hang on to it.)


Then you put it in the microwave on high for 1 minute and presto!
A personal sized (think cupcake size) treat!  And that spoon you hung on to?  Use that to eat it!


It passed inspection by both the fourteen year old, and the eighteen year old.  (Oh, and  the forty-two year old!)


I figured out the calories for this particular mixture and it is a nice, light 119 calorie snack.
I'll bet a dollop of whipped cream would be good with it.

1 minute, 2 TBSP water, 3 TBSP mix.... 1-2-3!  My new favourite treat.  I hope you enjoy it too. Pin It