Pages

Showing posts with label just for fun. Show all posts

Saturday, March 15, 2014

Rapunzel dress for my princess


She wanted to be Rapunzel, from Disney's Tangled for Halloween.  If you haven't watched Tangled, you should!
Did I happen to mention that my little princess, who wanted to dress as Rapunzel, is fifteen years old?  And she wanted to look like Rapunzel, not a trampy version.  (You have NO idea how much that pleases me!)

They don't seem to make nice costumes for anyone over ten years old, and even then they are pretty crappy quality -or super-expensive.  So I decided that I would try to make one for her.
The only experience I have making a dress is when I made my own Sally Ragdoll costume two Halloweens ago.  I didn't know what I was doing then either.  After looking at pictures online, I picked up what I thought was the best fabrics and embellishments for the job.  This costume cost more than Sally did, I think it totalled about $33, which is still a bit expensive to me, but better quality (and length!) than the store bought ones.


I looked online for tutorials from others who have made a Rapunzel dress.  I took elements from several different places and did my own thing. That is why I am not crediting any specific source for any sort of tutorial.  I didn't follow any!

So, here is the dress mostly finished.  I made the top a double layer since the fabric I chose was quite thin.  She wore it to an event at this stage of completion.  She was helping out at her old elementary school for an activity/family night the school was hosting and the theme was fairy tales.  I made one sleeve a smidge too small and it tore up the seam.  Twice.  I just re-made it the first time, the second time I made it a little bit bigger and it held.  The dress itself is done here, it just needs some painted embellishing on the skirt done now.
We still need detail on the front panel.
 I think the most difficult part of the whole dress was getting all of those eyelets installed.  I smashed my poor thumb in the process.

This is what I was going for:
http://movies.disney.com/tangled-gallery
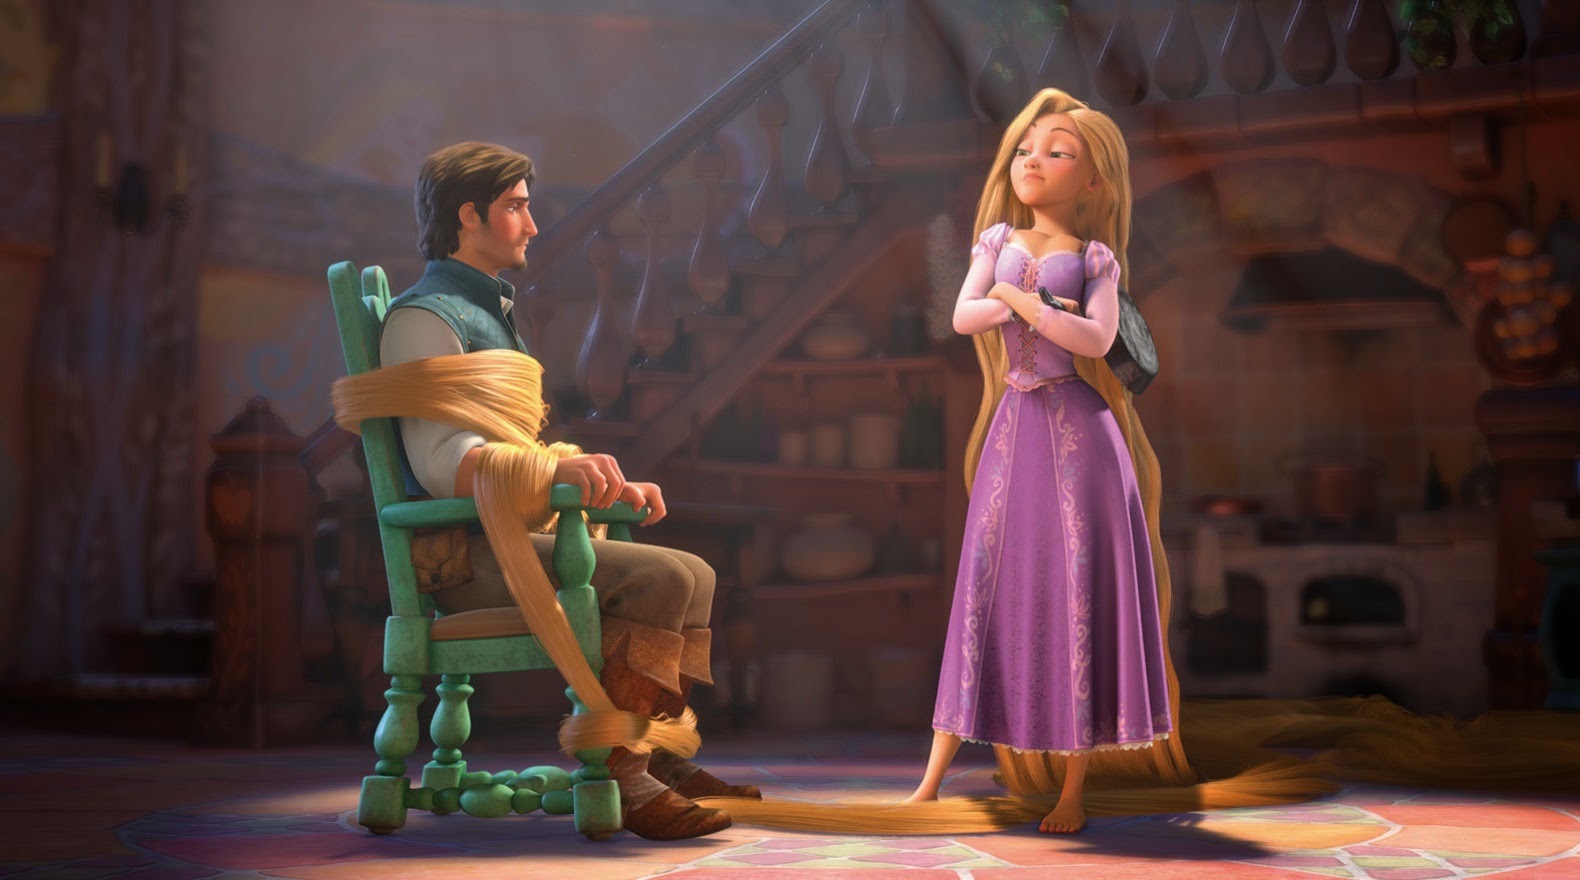
(if I did it right, the picture itself links to the Disney site I found it on)

I agonized over how I was going to post the finished dress.  I feel that if my kids are going to have their photo on the internet, THEY should be the ones to put it there.  So, using my fabulous photo manipulation skills, I pasted Rapunzel's face over my daughter's.  Not bad, if I do say so myself!!  (hahahahahahahahahahaha!)   I even made her a Pascal (Rapunzel's chameleon sidekick) to go with her costume.  You see him at the top of this post, and on the top of her head here.


She is even posing like the picture above.  :)


At one point in the movie, Rapunzel braids her hair up and puts flower in it, so that is what we did with our Rapunzel.

She has already worn this dress three times, two of those times, it was totally finished.  I would say it is a success.

Thanks for looking!
:)

Pin It

Monday, February 17, 2014

Fairy in a Jar

Don't let this happen to your fairies!
Always make holes in the lids of your jars when catching fairies, fireflies or anything living!


Quite some time ago I had seen some really cool looking "dead fairies" online.  I decided then that I wanted one of my very own.
 
I am not sure where to find fairies around where I live, and even if I did, I would never want to sacrifice it for a conversation piece. 
 
So I made one.
 
 
After two Halloween's of searching, I finally found these little skeletons.  Six to a package.  They don't move except for at their hip.  Each leg swings freely.
 
The fairies I had found online were all standing up in their jars, leaning against the glass.  I had it in my head that I wanted mine sitting on a mushroom, looking thoughtful. 
 
Things rarely turn out the way we plan them though.  And my first problem was that I had no idea how to shape this little skeleton.  My husband told me that a heat gun would probably do the trick, and he would do it for me since I was a little afraid of burning myself.  So I gathered up a few skeletons and brought them to his shop and modelled how I wanted her sitting.  My husband was able to get her pretty close to what I wanted.  I wanted her chin resting on her hand but that just wasn't meant to be and she wanted to be resting her forehead in her hand.  In retrospect, I like this much better.
 
 
I also scrapped the mushroom idea for two reasons.  I hadn't thought about how I was going to make one yet.  And my husband had this great old branch handy that looked absolutely perfect.

Originally I was going to try to "age" her wings since they had been in the jar as long as the fairy, but I really loved the look of the glittery wings against the rest of the dull, dreary items in the jar.

 
I also scrapped the idea of having a wand lying on the ground by her.  I don't think real fairies have wands.

 
I had a lot of fun making this.  It was nice to spend some time in my husband's shop doing something other than giving him a hand too!
 
Thanks for looking!
:)


Pin It

Sunday, September 8, 2013

Watermelon "cake" Or What a Mean Trick!

I saw this amazing looking "cake" while roaming Pinterest and had to try it.
The pin lead to this site

My youngest daughter and I really wanted to try this.   And weren't we lucky?  We were having visitors in the very near future  What an awesomely amazing dessert to have after lunch!!

We didn't follow the ingredient list or directions on the website.  We just did our own thing, using the basic idea.

We had lost our internet for a couple of days, conveniently when I needed to shop for this, so I did it out of memory.  A watermelon, some decorative fruit, and whipped cream.  I had forgotten all about the almonds, but, even if I had remembered them I would have skipped them this time because toddlers were coming and I don't think toddlers typically like almonds.

So, while I was cutting the rind off the watermelon, and slicing our "cakes" into wedges (we opted to make two shorter cakes as opposed to one really tall, awkward one)  my daughter was busy preparing the whipped cream.  Then I sliced fruit while she decorated.

Slicing up the melon into wedges ahead of time makes it so easy to serve too!  I am so glad I remembered that step.

I think we make a great team!  Here is our version.  Not quite as pretty as the original, but we were happy with it.  It looks like a regular cake, I was a tiny bit worried that the kids would be disappointed to discover it was fruit.  Turns out, it wasn't a child who was disappointed.  Oops!


Will we do this again?  Definitely!
Thanks for looking!
:) Pin It

Friday, May 17, 2013

A Tip for Ironing a Freezer Stencil

While making a Walking Dead shirt as a gift for someone, I realized that stenciling words can be a pain in the butt.

This still needs a final wash to soften up the paint and get the cat and dog hairs off it.


Letters can be tricky when freezer stenciling a shirt.  Especially when the letters have holes in them like "D", "a" "e" "R" and "O", all of which are in this shirt!
 
But, through practice, I have learned a little trick.
 
I make my stencils by printing what I want out on a piece of regular printer paper.  Then I tape a larger piece of freezer paper, shiny side down, to my cutting mat (I have graduated from a piece of cardboard to a real cutting mat!  What a difference!) and I tape my print out onto the freezer paper and cut through both pieces with an exacto-knife.
 
It is tedious, but worth it.
 
Never throw anything away!  You need your freezer paper holes, so keep track of them.  You also will want your plain paper letters.
 
In the following photo, I have ironed down the big piece of my stencil and most of my holes.  I still need to iron the holes in place for my "R" and my "O". 
I saved my plain paper "R" to use as a template for properly placing my hole. 
 
 
See? I carefully put my plain paper "R" in place and then, even more carefully, placed my freezer paper hole (shiny side down! That is very important or you will adhere it to your iron!) 
 
 
Then, even more carefully than before, iron over your letters. (and marvel at the way I was able to iron with one hand and take a photo with the other and never scorch my project!) 
You will iron the hole in place and just remove the plain paper "R" with no trouble! 


 Perfectly positioned!


 I did the same with the "O" and have lovely letters.  Now I am ready to paint.


 Don't forget the teeny zombie on the back of the shirt!

I am very happy that the recipient of this shirt really likes it.  I have even seen him wearing it!  And I don't think he put it on out of obligation either.  ;)

Thanks for looking!
:) Pin It

Monday, May 6, 2013

Monster Books of Monsters ~ FINISHED!

Finally done!  Hooray, hooray!!!!!!!
I started these almost a year ago, it's about time I got them finished! 
If you'd like to see the progress, you can see part one,  part two and part three by clicking the links.
 They still look pretty cuddly, but I am happy with them.
 
After getting them all sewn together, all that was left to do was put their titles on.  I wanted it to look like gold embroidery.  I started by trimming the fur to give myself an area to paint on.

Then I practiced on some leftover fur that I had saved. I had gold glitter paint that I was planning to use, but it doesn't show up by itself.  I tried painting the letters in black, brown and yellow first, then went over them with the gold.  I liked the look of the yellow the best.  I have so many smears of yellow on my practice fur, it is difficult to see what I have here, but it is all my practicing.
 
Then I painted my titles on.
 
"Monster Book of"


"MONSTERS"

 
A front view.  He has a little fur blocking his leftest eye, I see.
Maybe I won't give these to the kids...


Now that I finished these, I can make my Iron Man T-shirt!
Thanks for looking!
:) 
Pin It

Monday, April 1, 2013

Monster Book of Monsters: Part Three

Just held together with pins at the moment
 
Well, my high hopes for fabulous teeth were temporarily dashed when this is what I created.
This will not do at ALL!
I had decided that I was not going to make any sort of template or pattern because I want both books to look different.  So I picked up a piece of fabric and folded it in half and just stared sewing teeth.  It actually didn't look too bad... Until I tried to turn them right-side-out.

Back to the drawing board.

After some thought, I decided that making each tooth individually was the way to go.  Again, I didn't use any sort of pattern.  I just sewed what looked like a tooth.  Just one at first.  It looked perfect! So I went all out and sewed up a whole bunch.  Then I arranged them on the table and switched them around until I thought they looked right.
 
 
Then I put a little stuffing in each one and pinned it to the "gums".  I put a piece of batting between two layers of red to plump them up just a bit. 
 
 Made myself a tooth sandwich and sewed it up.
 
 
 I also made the tongues using red and a little batting for substance.
 
 
 And here is where my Monster Books of Monsters sit now.  All pinned together.  I need to sculpt around the eyes a little more.  Both of the girls just want to hug these guys, and they are supposed to be a little menacing.


Here is what they are trying to look more or less like. 
These images were found on a Google Images search for "Monster Book of Monsters"


Next I need to sew these together and come up with a way to get the title on them.
Thanks for looking and following my progress!
:) Pin It

Tuesday, March 26, 2013

Monster Book of Monsters: Part Two

I've lost my crafting mojo.  I just haven't been in the mood to craft.  Today, however, I decided that I need to finish these Monster Book of Monsters.  I've only been working on them for about ten months!!!  You can see the start here, if you'd like.


So, I got out my eyes and chose suitable ones.


I made little pillows to put them on, and attached the eyes.  These are very lightly stuffed so that they can be sculpted under the fur.
 
 
I carefully slit the fur after determining the position of my eyes.   Then I sculpted a little around the eyes. I will probably do a little more sculpting detail later.  He's going to have trouble seeing with all that fur in his eyes! 


 So I trimmed a little around the eyes.
This is where my Monster Book of Monsters stands at the moment. 


Next up: The teeth. I'm making them soft.  These will make or break this project, I think.
I have high hopes for this.

Thanks for looking!
:)

Pin It

Thursday, January 24, 2013

Neville's Remembrall


In case you don't know what a remembrall is, it is a clear glass ball that fills with red smoke when you have forgotten something.  Neville receives one as a gift from his grandmother in Harry Potter and the Philosopher's Stone.  It immediately turns red, prompting Neville's quote in the above photo.
Photo found here
I have had the idea for making this for at least a year, but I couldn't find a suitable material for the gold trim.  A little while ago, I just happened to find the perfect ribbon.

Instructions aren't really needed.  I stuffed small pieces of gauzy red ribbon into a clear glass Christmas ornament and carefully glued the gold ribbon around the ball.
That's it!

Thanks for reading! Pin It

Saturday, January 19, 2013

Superhero capes for super kids!


My cousin's 3-year-old little boy uses his bathrobe as a superhero cape.  I am of the opinion that every child should have a superhero cape.  My 14 year old daughter even has one, and has had it for years! Sadly, my 19 year old doesn't want one.
When I found out that my super small cousin didn't have a real cape, I decided to remedy that situation.  And while I was at it, I made one for his 1½ -year-old sidekick, um, I mean sister, and one for the very littlest cousin.
 
I started by picking up some fleece in colours that I thought would be good for budding superheroes.
 
 
 Then I got my cousin to tell me the measurement of her children from about the back of a t-shirt collar to the floor and I used that measurement (minus just a little) to get the  length of my capes.  I wanted them to be almost floor length so they could use them for quite a while.
Don't look too, too close.  I took this picture after the capes were almost done. 
That is why you can see the collar detail.
Sometimes I forget to document my progress.
 
I sewed their initials onto the back of the cape and added a little colour to the collar.
I also sewed a little piece of velcro to the collar with the soft side facing their skin so they won't get scratched.  I want the capes to be able to tear away easily if the kids get them caught on something.  That is why they do not tie closed.
 
Then it was on to the tiniest of our superheroes! He is just barely one year old and I thought a cape like his slightly older cousins might be a little dangerous for him.  I also didn't think his initial on the back would look like an initial, so I painted the front.
First I designed my stencil on the computer and printed it out.  I laid that over a piece of freezer paper and cut my design out.
 
I had to be sure to save the "holes" from the letters p, e, O and the second e.
The arrow is pointing at the "holes" from the letters.
 
Then I ironed the stencil onto the shirt. Being very, very careful to place those holes I saved in the correct spot.  Then I used my fabric paint and painted my stencil, forgetting to take pictures, of course.  The next morning, I peeled my stencil off the shirt and heat-set my paint (as the instructions on the bottle tell me to) 
 
Then I sewed the soft side of some velcro to the shoulders of the shirt, cut out a cape shaped piece of fleece and sewed the matching side of the velcro to the shoulders of the cape!
 
Ta-da!!!
 
This active three-year-old LOVED his cape!  His sister...not so much.  She didn't hate it, I just don't think she really cares at the moment.  I can live with that.  But that is why I have no pictures of her.
 
I didn't get a picture of Super Owen because he wasn't wearing an outfit that allowed for changing his shirt, but his Dad sent me this picture the next day!  Well, without the mustachioed happy face... 
 
I'd say that the capes were a success.  :)
 
Thanks for reading!
 
 
Pin It